Ahhhhh….the lighting of the great room. This has been a puzzler for us….but I think we have figured it out?? Possibly? The room is 50 ft, by 30 ft, with a 28 ft ceiling. The walls are 16ft tall. And the bottom of the truss is at 20 feet. Got it???? 😳. If it matters the ceiling pitch of the roof is 10/12.

This photo is taken from the upstairs loft (playroom).

Ok….this photo shows the entire right side wall……under the truss on the right side wall is going to be an exposed duct. It will be 18 inches in diameter.

Very much like this (but on the other side).

In the right corner you can see where the top duct will come out of the back wall…take a little turn and head across the right wall. (That corner is the kitchen).

This photo shows the vaulted ceiling….with the flat ceiling of the dormer.

Sorry this picture is fuzzy. But here is the great room plans. The trusses (there are five) and the ridge beam, and the beams that go below and above the dormer, are all indicated with dotted lines.
Ok!!!! Hope you are still with me!
So this is our plan…I think. On the wall, in between the trusses we are going to put a two or three spotlight track light. The ones behind the A/C duct will be fairly hidden, so it’s just the front door wall you will see them. And they will be white on a white wall. I think they will easily disappear.

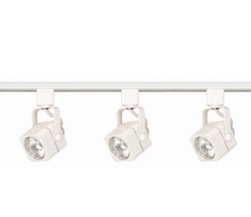
Something like this…one spotlighting the truss to the left one spotlighting the truss to the right and the middle one facing across to the opposite ceiling. I would love LED’s but we might just buy some lesser expensive ones now and it will be easy to change out one day. Still have to do some research on prices.

Ok (I sincerely apologize for the crayon)!!! The three red X’s are the three chandeliers. The one in the living room (in front of the fireplace) will be a eight/nine foot chandelier. The one over the dining table will be a bit smaller, maybe six feet. Then the one in the kitchen is off center, off the dormer beam, so it is over the middle island. Lighting up the kitchen area.
The green X is an 8 foot industrial fan. The one we are getting is the MacroAir, Air Elite.

Now I use the word Chandelier looslely!!!! They may be large pendants….or a “something” repurposed into a light.

This is a binder…..it is a farm implement that was used in the twenties and thirties. (I found this photo in country living UK). We have two of them in one of our old barns.

My girlfriend saw these and saw a chandelier……I could see it!!! Over the dining room table. Now I have gotten some very varied reaction to these. From “I can totally see that”. To “what are you smoking”. I have no idea how I can make it work. I don’t know if I can make it work. I just think with all white walls and the old wood…..that crazy binder just might look cool?

I am thinking one of these big 200 watt old barn pendants in the kitchen??
The living room?????? I have no idea.
Well that was a bit long winded!!!! Thanks if you made it through.
Any input is welcome, and it won’t hurt my feeling if you hate my binder. 🙂
H 🙂


 Hallway looking from the master to the great room. It’s a very heavy looking ceiling….I wouldn’t have wanted it everywhere. But I like it here. This hallway will be a gallery for artwork that my Mother in law has painted.